In this article I’ll share two wooden toy woodworking
projects that sell and these are low cost projects which are simple to build.
Snazz it up with a cost of creative paint and you will get high margin on these
toys. Have you seen the prices on premium wood toys for kids these days? They
are exorbitant and it is a huge market. Why not join in with these 2 woodworking
projects as a start.
Extractor / Earth Mover Woodworking Plan
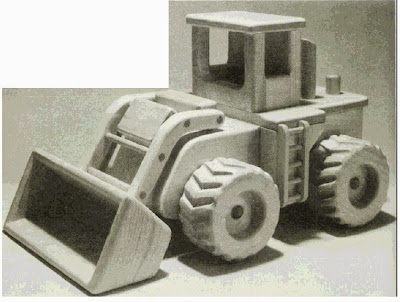
This earth mover wooden toy features a moveable shovel that
stops in different positions. This woodworking project should successfully accommodate
most of your child’s heavy earth moving needs for quite sometimes. It is
pictured here built in clear pine but it can be built in a wide variety of
woods, soft maple would be an excellent alternate choice.
Begin construction of earth mover woodworking project with
the body. Rip an 18” length of ¾” stock 4-1/2” wide then set the saw for a 30
degree bevel. Make a crosscut to produce the mitered ends. Cut from the
remainder then make a series of 1/8” deep kerf cuts spaced 1/8” apart to detail
the radiator grille. Cut the side pieces to size then bore the axle holes
before assembly. Use a belt sander or hand plane (or both to form the front end
curves. Cut the cab and remaining body parts to size then use the router with a
5/32” corner rounding bit to ease all sharp corners before completing the body
assembly.
Construct the bucket and bucket arm assembly. Mark the
location of the arm ends and uses a chisel to cut the ¼” deep mortises to
receive them. If you have a brad point or Forstner bit that bores a flat
bottomed hole, use it first then square the corners with the chisel. The bucket
pivot is nailed and glued to the body after the entire bucket assembly has been
completed.
The fat wheels of this extractor woodworking project are
made up by joining two discs of 1-1/8” stock after angled holes are bored to
form the knobby treads. The simple jig used to bore the holes features a
hardwood guide block which has two holes drilled at 20 degrees angles in
opposite directions. Note that these holes must align with the pivot hole so
they are bored from the bottom of the block before the jig is assembled. The
jig may be used with a portable drill or on a drill press. If using a drill
press tilt the table or prop the jig so the bit enters the angled guide holes
squarely. Bore the holes in discs #1 and #2 as indicated. To save layout time
make photocopies of the wheel diagram and attach to each disc with rubber
cement.
Use a 2” dia. Forstner bit to bore the recess in the outer
disc, Part 1, then counter bore for the plug and axle. Saw the discs to final
size after the angled holes are bored to reveal the treads. Use the router to
round over the corners. Sand then glues the wheels to the axles in place on the
body. Finish with several thin coats of shellac or two coats of polyurethane
finish.
Wooden Rocking Horse Woodworking Plan
Next woodworking project that sell well is Wooden Rocking
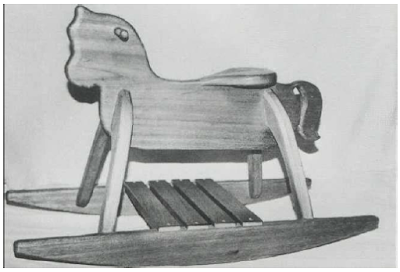
Horse. A rocking horse is one of those toys that never goes out of style. The
one shown here is designed for sturdiness as well as stability. The runners are
spread far enough apart to prevent a small child from tipping over, and the
tail is left mostly connected with the body so it cannot easily be broken off.
The wooden horse shown in the woodworking plan was made from 5/4 Philippine mahogany
stepping material, except for the handle, which was formed from a hardwood
dowel. Substitute other woods if you like, but always use quality material for
a toy that can be passed along in your family for generations to come.
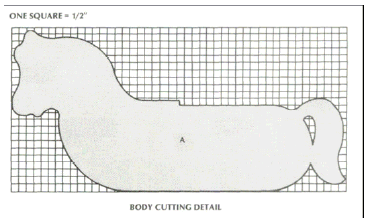
1. Use the pattern provided to make a template for cutting
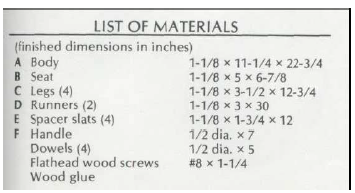
out the horse’s body (A). Tape or glue the pattern to a 23” length of 5/4 x 12
stock, then cut out the profile with a band saw or saber saw.
2. while the pattern is still attached to the body, bore a
starter hole for the teardrop opening in the tail area, then use a saber saw to
complete the cut. Also, mark and drill a ½” diameter hole through the head for
inserting the handle (F) and two pairs of holes of the same size in the areas
where you want to attach the legs (C )
3. Since exact duplicates are needed for the four legs, it is
a good idea to make the leg template out of cardboard. With careful arrangement
you should be able to lay out all four legs on an 18” length of 5/4 x 12 stock.
Cut out the legs with a band saw or saber saw
NOTE: The edge of the notch at the bottom of each leg must
be angled 12” off square so that all four legs will slope in toward the horse’s
middle. If you prefer, cut out the legs without notches first, then figure out
the notches during assembly. The length of the notches is not critical, so long
as they are the same on all four legs and the tips of the legs remain above the
bottom of the runners after assembly.
4. Lay out the two runners (D) on one side of a 31” length of
5/4 x 12 stock. Set them closely together so that enough width remains on the
board for cutting out the seat.
Those are woodworking projects that sell well. Now give it a
try and earn money from it!
Check out other woodworking projects that sell:
- Baby Cradles Woodworking Plan
- Heart Shaped Cheese Box
- Painted Pine Frames Woodworking Plan
Check out other woodworking projects that sell:
- Baby Cradles Woodworking Plan
- Heart Shaped Cheese Box
- Painted Pine Frames Woodworking Plan


No comments:
Post a Comment