This is the third post on woodworking projects that sell topic. In this article I'll share the detailed step by step woodworking plan for Heart Shaped Cheese Box as shown on below picture
Heart shaped Cheese Box Woodworking Plan
This woodworking project had its beginnings in our ever pressing need to tidy up our workshop. The problem was, of course, what to do with the mountain of offcuts? I'm sure you know what I mean. The chair, table, box or whatever is finished, and you are left with great heaps of wood. Okay maybe the longer lengths can be used for the next job in line, and the shaving can be used as fuel or as bedding for your chickens, and the dust can be swept up and put in the trash, but what to do with the medium size bits and pieces that look too good to throw away?
Well after a deal of thought we came up with the super brilliant idea of cutting all our small offcuts down to a uniform size, and then laminating the resultant blocks to make cutting boards and surfaces that needed to show end grain. Okay so it is a solution that involves a lot of time, sweat and efforts but then again the finished boards can be presented or marketed as choice woodworking handcrafted items
This is a wonderful creation and is the top 3 of our best selling woodworking project. If you are up to your knees in offcuts, or you are short of cash and maybe know of a sawmill operator who is looking to give away his trimmings free, then perhaps this is the project for you.
Making the board for this woodworking project
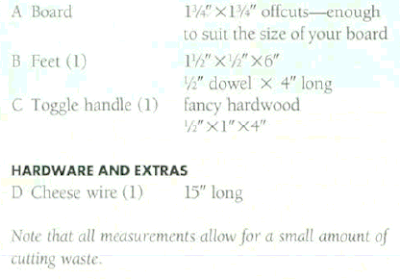
Collect all your waste wood and cut it down to the best overall section size. I went for a square section 1 3/4" x 1 3/4", but you can just as well go for 1" x 1" or 1" x 1 1/2", or whatever size that best suits your material. If you want to use a mix of sizes, then no matter, as long as the grain is running along the length and the corners are true at 90'. Having achieved your sawed size, plane the wood down to a smooth finish. When you are happy with the finish, saw it down to 1 1/8" slices. When you have a skockpile of 1 1/8" slices, pencil label the endgrain face, arrange the slices side by side in rows of about 12" long, and spend time working out how best to clamp them together. You can use a couple of G-clamps and a bar clamp, or a jig and wedges; no matter, as long as the arrangement is such that you can apply end pressure without the strips bending or bowing along their length. Do the gluing up in two stages: first the blocks side by side to make the strips, and then the strips side by side to make the slabs. Draw the woodworking plan design of the board on the slab, cut out the profile and sand the end-grain woodworking surfaces to a good finish. Fit the whittled feet and the woodworking cutting wire, give the whole works a coat of matte varnish and the project is finished.
Woodworking Special Tip: Dry it first
As the success of this project hinges on your being able to glue and clamp dozens of the little blocks together, it is important that you plan out the procedure. The best way is to have a trial woodworking dry run, iwth everything in place except the glue. You need to check out the glue type and make sure that it's suitable, clear an area and make sure that there is room to maneuver, have cloths and newspaper handy, and so on. And then you have to actually clamp up the wood and see how your arrangement works out. Okay, so maybe my way of working does sound a bit fussy, but the borrible alternative is to have glue smeared all over the place, only to find that the clamp isn't long enough, or you have glued the wrong surfaces, or you are missing some vital piece of equipment
Step by Step Woodworking Plan
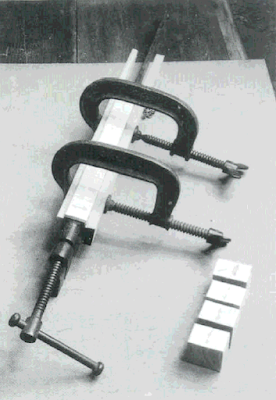
Saw the 1 3/4" x 1 3/4" square section of wooddown into 1 1/8" thick slices - like slices off a loaf of bread - and then clamp up. With the arrows indicating the run of the grain, you can see how the slices of wood need to be realigned when it comes to gluing.
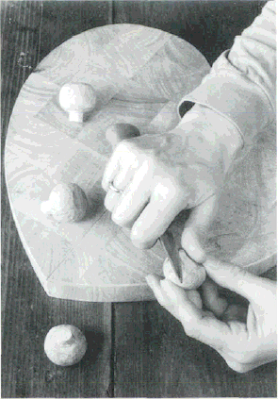
The best way of ensuring that the little ball feet stay in keeping with the total design is to whittle them to shape. I drilled and doweled four little square blocks, cut the corners off the blocks to make rough octagonals and used a largish sloyd knife for the whittling.
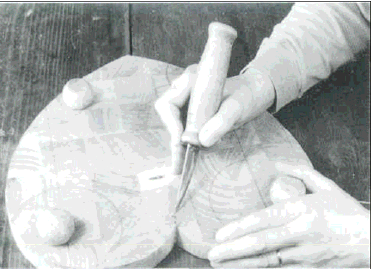
To fix the wire, drill a 1/8" diameter hole set the woodworking wire in the hole and then follow it up with a glued dowel. Make a saw cut between the cheeks, wrap the wire over and around in the cut and follow it up with a glued sliver wedge. Having whittled a small piece of hardwood to a woodworking butterfly shape and sanded it to a super smooth finish run two side by side 1/16" diameter holes through the center of the bow, and knot the wire in place.
And just in case you have an aversion to heart shapes woodworking, there is no reason at all why you can't go for just about any shape that takes your fancy. For example you can simply round the corners of a rectangular board.
Check out other Woodworking Projects That Sell Posts:


Get your access to 16,000 woodworking plans.
ReplyDeleteTeds Woodworking has more than 16,000 woodworking plans with STEP-BY-STEP instructions, pictures and drafts to make all projects laughably easy!!!
If you are in need of urgent loan of any kind then you should apply for a loan from Mr Lavington , you can get various types of loan from him like
ReplyDeleteHome loan
Business loan
Student loan
Short loan
Medium loan
Long loans e.t.c
He offers loan at interest rate of 2% and with very easy loan conditions, so for you to get your loan today contact lavingtonfinance@gmail.com you can call me +18288270635
Thanks