Saturday, May 30, 2015

Woodworking Projects That Sell (Part 4)

Picture Frames Woodworking Plan


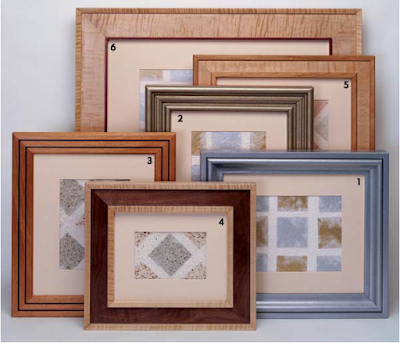
Everyone needs more picture frames ! That's why I share picture frames woodworking plan in Woodworking Projects that Sell blog post series. By far this is one of our highest volume in sales. The best thing about it is that it is super make with versatility for different designs
picture-frame-woodworking-plan

Painted Pine Frames Woodworking Plan

Our first two frames are made from pine and are great candidates for a paint finish. They feature standard moldings available at wellstocked home centers. for all the frames its best to cut the rough materials about 2 or 3 in longer than necessary before ripping to width or machining.
painted-pine-frames-woodworking-plan

Sunday, May 24, 2015

Woodworking Projects That Sell (Part 3)


This is the third post on woodworking projects that sell topic. In this article I'll share the detailed step by step woodworking plan for Heart Shaped Cheese Box as shown on below picture
hearth-shaped-cheese-box-woodworking-plan

Heart shaped Cheese Box Woodworking Plan

This woodworking project had its beginnings in our ever pressing need to tidy up our workshop. The problem was, of course, what to do with the mountain of offcuts? I'm sure you know what I mean. The chair, table, box or whatever is finished, and you are left with great heaps of wood. Okay maybe the longer lengths can be used for the next job in line, and the shaving can be used as fuel or as bedding for your chickens, and the dust can be swept up and put in the trash, but what to do with the medium size bits and pieces that look too good to throw away?

Saturday, May 23, 2015

Woodworking Projects That Sell (Part 2)

This is the second post on woodworking projects that sell. This time I'll share the Baby Cradles Woodworking Plan. Enjoy !


Baby Cradles Woodworking Plan

Baby cradles is one of the most selling woodworking projects since parents and grandmas gobble these crafts up like candy. Even better, baby cradles sell well all year round and parents with kids will not hesitate to spend on well crafted baby cradles for their kids. This has always been the secret to success in woodworking business. Target the right market and your profits will follow
woodworking-project-that-sell

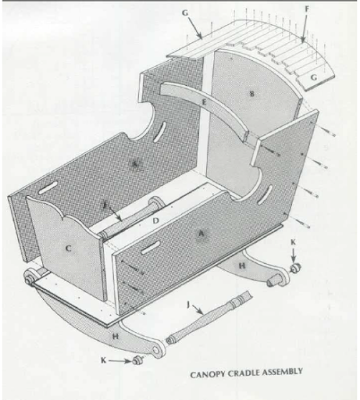
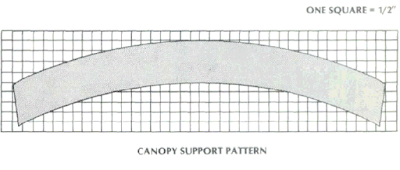
The lightly arched canopy protects a baby's sensitive eyes from harsh light. The convenient treadle bars allow you to rock the cradle with one foot while reading or knitting. In short its the perfect way to rock your child to sleep
baby-cradle-material-list

canopy-woodworking-plan

  1. Use the patterns provided to cut the shapes of the sides (A), headboard (B), and foot board (C) to the dimensions provided. Cut the angle ends and bevel edges as shown

Saturday, May 16, 2015

Woodworking Projects That Sell (Part 1)

In this article I’ll share two wooden toy woodworking projects that sell and these are low cost projects which are simple to build. Snazz it up with a cost of creative paint and you will get high margin on these toys. Have you seen the prices on premium wood toys for kids these days? They are exorbitant and it is a huge market. Why not join in with these 2 woodworking projects as a start.


Extractor / Earth Mover Woodworking Plan

earthmover-woodworking-project

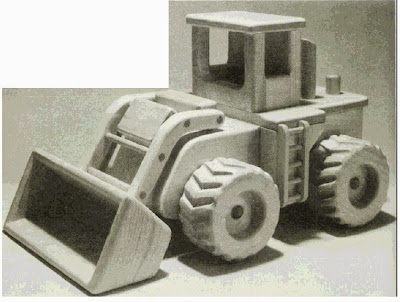
This earth mover wooden toy features a moveable shovel that stops in different positions. This woodworking project should successfully accommodate most of your child’s heavy earth moving needs for quite sometimes. It is pictured here built in clear pine but it can be built in a wide variety of woods, soft maple would be an excellent alternate choice.

Begin construction of earth mover woodworking project with the body. Rip an 18” length of ¾” stock 4-1/2” wide then set the saw for a 30 degree bevel. Make a crosscut to produce the mitered ends. Cut from the remainder then make a series of 1/8” deep kerf cuts spaced 1/8” apart to detail the radiator grille. Cut the side pieces to size then bore the axle holes before assembly. Use a belt sander or hand plane (or both to form the front end curves. Cut the cab and remaining body parts to size then use the router with a 5/32” corner rounding bit to ease all sharp corners before completing the body assembly.